

A little over a month ago, our Yafa Brands representative, Ken, visited Pen Boutique for a team training session and to tell our staff about all the exciting pens and inks coming soon from Monteverde, Conklin, Diplomat, Delta, Pineider, and the other brands distributed by Yafa. There were some very interesting pens on the horizon, but the product that caught my attention most was Monteverde's innovative new collection of color-changing inks.
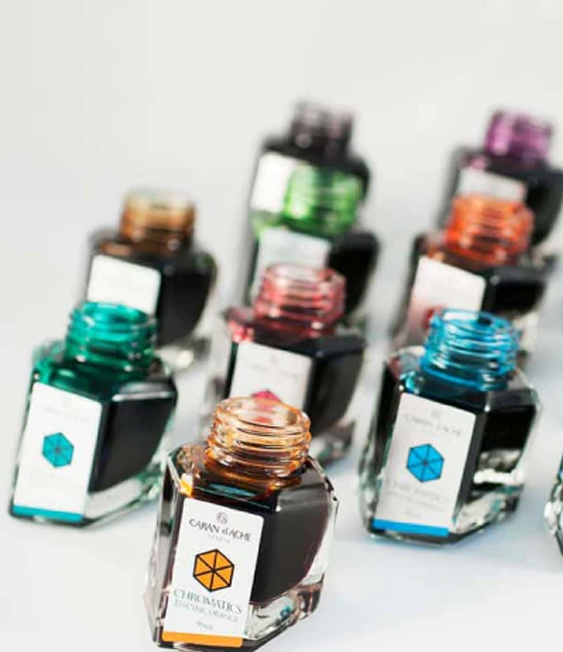
When Ken described the set, which contains nine bottles of highly saturated ink, plus one clear color-changing Changer formula, we were all fascinated and couldn't wait to see it. Ken couldn't tell us how the chemical process works (probably because it's magic), but somehow the inventors at Monteverde had discovered a Willy Wonka-like secret method of producing inks that look, smell, and behave like perfectly normal inks, but, when they come in contact with the invisible Changer, they transform to a completely different, even more vibrant, color! It was a little hard to imagine, let alone believe, but we eagerly waited for the inks to be released so we could see them for ourselves. Store owner Leena let us take one set of the inks out of our inventory for store use so we could experiment, and I asked her if I could also use the set to write a blog article about the topic. She agreed!
Uncontrollable Whimsy
First of all, let me get this out of the way. I was not impressed by this set's packaging. The box's slipcover shows muddy-looking unappealing shades with equally dull squiggly lines through them, and looks like it was designed in the 1970s. It's a very odd choice for a set of fun and vibrant inks that should excite the imaginations of children or artists. The box should show bright colors and look modern or even futuristic! Sorry, Monteverde, but I think you need a new design team. The set also includes a frankly hilarious insert explaining how great the storage box itself is and all of the many ways you can reuse it. It's so absurd that I don't want to spoil your fun by quoting it. If you buy the set, you can read it for yourself and get a good laugh! But, let's ignore the packaging, because it's really not that important. What about the inks themselves? They are stunning.

I have to admit, excited as I was to try this set, it took me a while to wrap my mind around the best way to use them, and this article took me a lot longer to write than you may imagine when you see how short it is. But, remember that this is a brand new innovation and these inks required a lot of trial and error to test, including many mistakes and missteps on my part. There is a bit of a learning curve to get the hang of the most interesting ways to use the inks, so you have to be patient with yourself. I wanted the images in my blog to look nice, so I was dissatisfied with all my first attempts and threw them away. When I started painting the picture above, I didn't know if it was a good idea or would end up in disaster. At first, my large swaths of highly saturated color just looked like a mess. But, I kept at it, and as I began to define them with my fountain pen filled with the Color Changer Solution, the brilliantly contrasting lines emerged and the whole thing started to make sense. It was a eureka moment for me. Suddenly, I stopped feeling confused and started feeling inspired. My painting is still kind of messy, but in an energetic and spontaneous looking way. Even my mom likes it!
Thanks to me, you can skip over some of my failed experiments and get straight to the fun. Check out my discoveries below, but, first, here's what Monteverde has to say about the set:
I'm not sure about the spontaneous poetry (I haven't experienced that yet), but I can definitely attest to the sudden bursts of creativity and uncontrollable whimsy.
Who Should Try These Inks?
To begin with, I can't overstate how incredible it is to watch these inks change color. The first time I saw it happen was when Shriya swatched them in our store, and we all gasped at the magical-looking transformation as she swiped a cotton swab saturated with the Color Changer Solution over each swatch on the little rectangles of Rhodia paper that we use in our Book of Inks. The change works whether the inks are still damp or totally dry, and is instantaneous, but develops more as the ink and the Changer Solution fully merge and dry together. The black ink, in particular, takes a little longer to reach its final intensity as it turns to a bright green. Just watching the colors change is very fun, and this would be a great set for kids, or anyone with a sense of wonder, to play around with. It truly looks like magic.

As I thought more about who would enjoy these inks, the most obvious answer was children or teens. They really encourage your imagination and creativity to run wild. This set is also perfect for artists, for the same reason. Once I started playing with it more intensely, I got more and more ideas about ways to experiment, and I think someone who is a better artist than I am could really get some remarkable results out of this set. They help you think outside the box and approach art in entirely new ways, allowing you to create effects with ink that were never possible until now. The third category of people who I think would most appreciate the color changing inks is fountain pen lovers who want to use their pens in innovative ways. Journalers and students (or any sort of note-takers) will find very practical uses for being able to easily highlight their written words. I will discuss more about the ideas I discovered below!
 (Here's how all the different inks look in writing. They are all good writers!)
Choosing Your Materials
These inks are very wet and saturated, so keep this in mind when you choose your pens and your papers. Don't put them in wet writing pens, or they may saturate your paper and bleed through. I found the Black ink (which turns a very cool neon green when exposed to the Color Changer solution, and reminds me of Diplomat's Matrix Green Elox pens) to be the wettest, and I regretted putting it in my medium nib Elox. The combination of the smooth wet Diplomat pen and the smooth wet ink was too extreme. However, this ink is fantastic in a fine or extra-fine drier writing pen! The ink is made with Monteverde's European Ink Treatment Formula (ITF), which ensures smooth flow, extended cap-off time, and protects your pen's ink feeding system. It really works! But, you just need to know how to properly take advantage of it, and don't misuse it. The second wettest ink is the Green one and it is also easy to overdo it with this color. It looks best when applied with a lighter hand.
To choose the best paper for these inks, you need to strike a balance between porous and slick. If the paper is too porous, the ink may bleed through to the other side. I didn't find the inks to be feather-prone, but, because you will want to use these inks to draw and color, you will be putting down a lot of ink, and you need a paper that can handle that. You may want to use them not only in fountain pens, but also with cotton swabs or paint brushes, and that can get messy. I recommend putting another sheet of paper behind the paper you are using, to absorb any ink that bleeds through, just in case. Mnemosyne, Rhodia, Write, and Midori MD paper handled the ink pretty well, although I did have some bleed through with the Black and Geen ink or when I really saturated the paper by laying down a lot of ink in one spot. It's best to use a paintbrush or cotton swab that is less soaked, and I found it helpful to remove some of the ink on a scrap piece of paper before I worked on my artwork, so as not to oversaturate the page. Keep in mind, however, that most of the colors look much brighter when they are more saturated, so it's great if you use paper that can stand up to a heavy application of ink, like the hot press watercolor paper I used for my artwork. I was able to get very intense and beautiful shades on this paper!
Surprisingly, I did not find the ink to be compatible with Tomoe River paper... not because it soaked through, but for the opposite reason. It took too long to dry and didn't bond with the slippery paper's fibers, so the Color Changer formula smeared the base color when applied on top.
Enlightened Experimentation
Amazingly, on compatible paper, applying the clear Color Changer formula does not make the colored ink run, and your writing or drawing will stay nice and crisp! Accordingly, I was able to do something I had never been able to do before: draw or paint a well-defined line on top of another ink that is still slightly wet! The top color, created by the Color Changer formula, does not feather and run like a regular ink does in this situation, so I didn't have to set aside my artwork and let it thoroughly dry before adding the second layer. This is a game-changer!
Not only that, but it is now possible to draw or paint a lighter color on top of a dark color! This is mind blowing and completely changes what you can do with your art. Imagine you are drawing an eye, for example. You have filled in the iris with color, then realized you wish you had left a small dot of white to show the eye's reflective highlights. Too bad, this is ink, so you can't remove it or paint a lighter color on top. Plus, leaving such a small spot or line of negative space is next to impossible in the first place because ink is so hard to control and you'd have to have inhuman dexterity to even attempt it. But, not anymore! With the Color Changing formula, you can easily highlight the eye with a dot of bright color on top of the dark color! Okay, it's not white, it's fluorescent yellow, but hopefully you understand what I'm getting at. These inks, if used creatively, allow you to do what was once inconceivable. (Note that the color change also works when the base ink has completely dried, so you can take your time with your artwork and make changes at a later date.)
Here's an example of how I took advantage of the ability to add light lines on top of a dark background. As you can see, I got a lot more inspired after my weird abstract circles painting and really started to enjoy the inks!

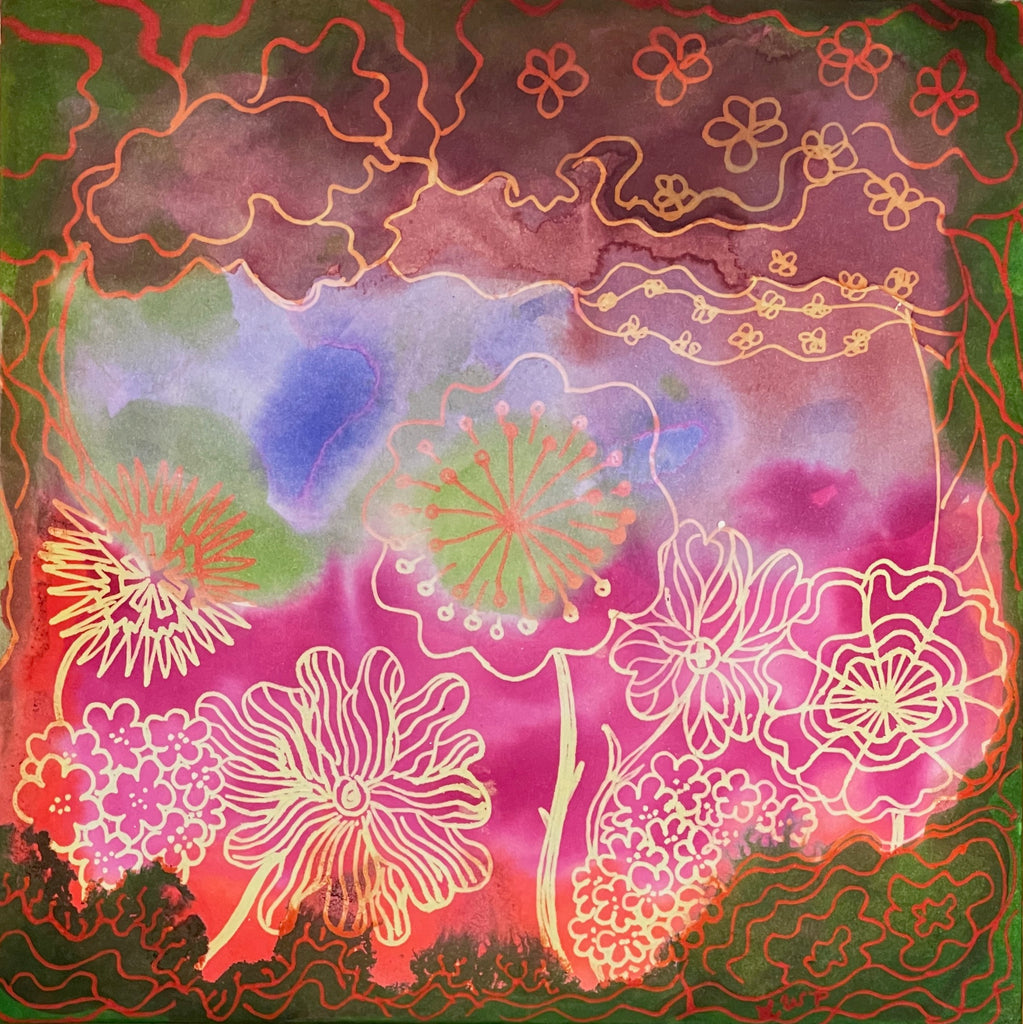
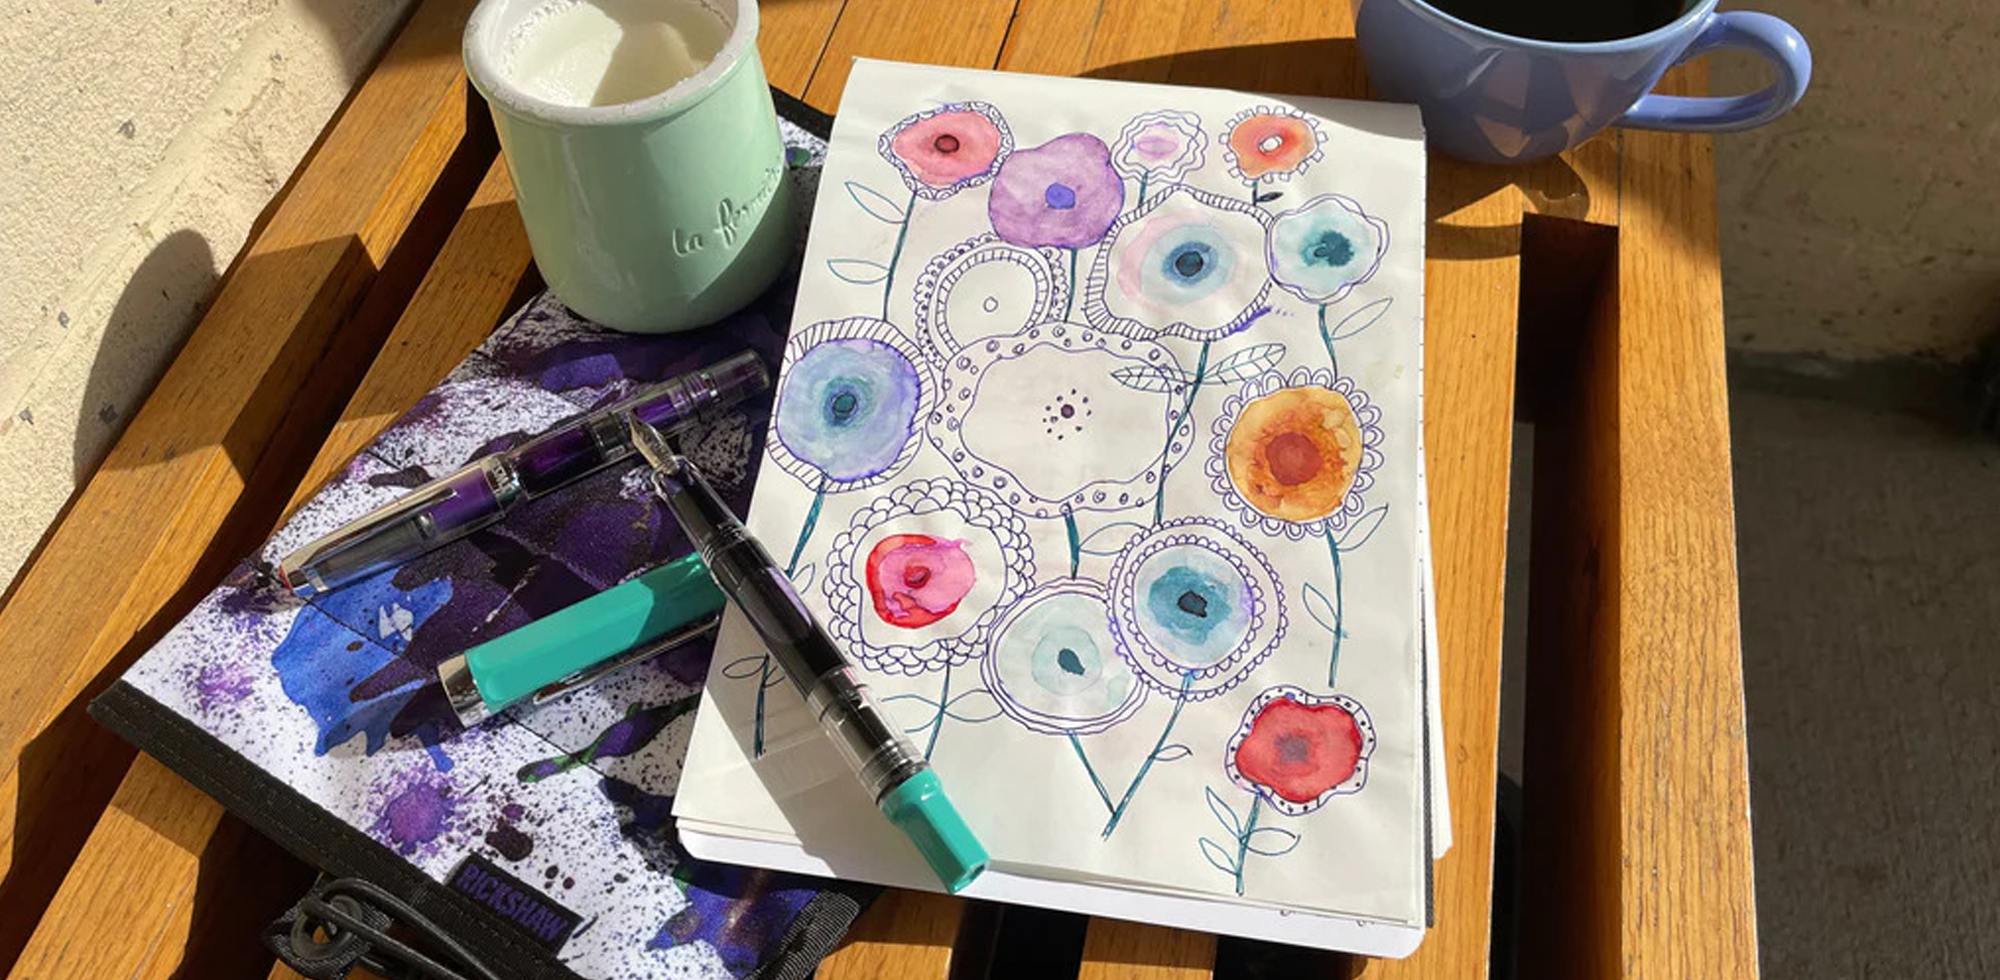
Experiment with diluting the inks if you paint with them! In my abstract circles painting, I used the inks at full saturation and they are very vibrant. In low light, the image stands out almost like a black light poster and is easy to see from across the room. It is very striking! For my flowers painting, I wanted a softer, more blended look, so I used a large paintbrush to wet sections of a piece of hot press watercolor paper. and then washed my choice of inks over the wet areas with a brush that only had a small amount of ink on it, to produce a much lighter and more translucent color. I allowed some of the inks to blend together, and, by applying some inks near areas of the paper that were still wet with another ink, I encouraged the second color to flow toward the wet color. (For example, the green ink at the bottom has some interesting and beautiful effects at its edges because the coral ("Red") colored ink above it was still wet.). After the inks had dried (which didn't take long), I drew on top with a medium nib Prefounte fountain pen filled with the Color Changer formula.
I think it would be very interesting to experiment with different pens and nibs with the Color Changing formula! The clear solution flows beautifully and is easy to use, so it would be compatible with a wide variety of pens. I chose a medium nib because I wanted to make enough ink came out to properly saturate the base ink and produce the change of color, but what about a stub nib, broad, zoom, or fude? You could get some really cool effects!
When you use the inks, think about what the secondary color will be, and plan accordingly. When I did the flower art, I chose inks that all had shades of yellow and orange as their "magic" color, and placed colors next to each other that would have similar alternate colors. This looked harmonious and beautiful when I used my pen to reveal the hidden shades. I used Green, Burgundy (very diluted), Fuchsia, Red, and Blue. Here are all the color combos, as they look on Mnemosyne paper. (I used the blank A4 notebook.) The colors will vary a little, depending on what paper you use, and how thickly you apply the ink.

I used a cotton swab to make the "clouds," then wrote on top with the Color Changer ink in my Prefounte. For the "invisible" cloud, I painted the cloud itself with the Color Changer formula, then used the Blue ink on top to reveal the edges of the cloud and write the color name in the center. Here's how the clouds looked before I used the Color Changer formula on them. You can make out the Color Changer cloud because the paper is still a little wet, but the Color Changer becomes completely invisible when dry.

As you can see, I over saturated the paper a little bit in a few spots, like in the Green cloud, for example. This is easy to do, but applying the right amount of ink is something I'll get the hang of with practice. Another thing to be aware of is that the colors change slightly as they dry. The ink that Monteverde calls "Deep Blue" becomes a lovely shade I would call violet, and the "Red" is more of a coral to my eyes. I really like both colors, and I especially love how the coral "Red" and the bright pinky Fuchsia look together.
Invisible Ink?!
As I discovered with my "invisible" cloud... YES, you can use the Color Changer formula as invisible ink! I experimented with using the invisible formula to create an imaginary note written by a girl to her friend. Using lined paper helped me keep my sentences straight even though the ink was clear. When wet, the formula glistens for a short time, so you can write without running over your own letters.
Here is my invisible ink note after it dried. It's truly invisible! The ink dries quickly, so you don't have to wait around too long for it to be ready to send your secret message.

Here's the secret message after I swabbed it with the Green ink. Again, I applied the ink a little too thickly in a few spots, so it doesn't look perfect, but so what? It's 100% readable, and if I were a kid I would totally use this invisible ink to pretend to be a secret agent and send messages that only my friend with a Monteverde Color Changing Ink set would be able to read! Or, how about a treasure hunt clue? Or a note about a secret crush? I would be so into this ink if I were in middle school, and what a fun way to get a young person into fountain pens!

Practical Purposes
Sure, writing secret invisible notes is fun, but what other useful purposes do these inks have in fountain pens? I loaded my Petrified Forest Estie with the Green ink and brought it with me when I had to go out in an attempt to get fully vaccinated this afternoon after the free clinic I went to in the city center this morning informed us that they had only received the flu vaccine, not the COVID one.

(Welcome 2 the Flu! But no COVID vaccine... sorry.)
When I got to the pharmacy in another city for my second appointment, they told me they had run out of COVID vaccine (gee, thanks for letting me make the appointment anyway, and not texting or calling to tell me ahead of time that you didn't really have the vaccine...), but instead of despairing about all the time I had wasted driving there, I decided to stop at a nearby cafe for a cortado and yummy toast. I used my pens to make a list of what I hoped to accomplish today.


(My special Estie has a fude nib custom ground by nibmeister Kirk Speer from Pen Realm, who will be visiting our store November 16-18. You can reserve an appointment for our store event on his website and get your own custom grind, repair, or tuning!)
I experimented with using the Color Changer to cross out the items on the list that didn't work out, but then decided it worked much better to highlight words I wanted to emphasize. A very practical use for this would be to use the base color ink for taking notes (in school, or otherwise) and go back later to highlight important parts with the Color Changer formula when you review what you've written. I really like the Green ink for this because the orange alternate color stands out a lot. I love how the words don't smear at all when I go over them with the Color Changer ink. Oh, and I was able to finally get my COVID booster at a third location in a different city a couple hours later. I kept my cool while driving all around to these various sites by thinking about what I was going to say about the Monteverde Color Changing inks, and listening to Verdi's Macbeth, my favorite opera for October.
I'm going to need to finish writing this article tomorrow because all that driving ate into a lot of the day, and it's after midnight, so I need to go to bed, but I was expecting that I'd need to stay home anyway because I often feel dizzy and weird the day after vaccinations. Hopefully I won't be too muddled to think of more cool ideas for the Color Changing Inks and get in a few more hours of photos, writing, editing, and videos.
Late Night Thoughts
Naturally, I couldn't stop thinking about the Color Changing Ink set even after I got ready for bed. Before I went to sleep, I made a list of questions to explore the next day after I felt rested enough.
1) Are they water resistant? Answer: yes! But when the Color Changer gets wet, it mixes with the base color and makes it look muddy. The base inks themselves, if used without Color Changer, perform very well when wet, so, if you are looking for some new water resistant inks, there is quite a variety of colors in this collection!

Both of these tests were messily written with fountain pens legitimately filled--not dipped--with the inks, then completely saturated with water. The water had partially dried when I took the photo. I tested all the other colors, as well, with similar results, but my test got messy because I had applied the Color Changer Solution, and I didn't have enough time to redo it to show you every color.
2) Does the Color Changer work on other inks? Answer: NO! I tried the Color Changer solution on a variety of other fountain pen inks, and they did not change color.
3) How do the colors look when blended, and what happens when a blended color is changed with the Color Changer?
For this experiment, I used a paintbrush to make overlapping stripes of the different inks on Marker Paper. The order I used was: Red, Fuchsia, Purple, Deep Blue, Blue, Green, Brown, Burgundy, and Black. Then I used a fountain pen filled with the Color Changer to write a message on top.

The letters showed up quite well, except the upper section of the word "and," where the Brown and Green stripes overlap. When transformed by the Color Changer, Green turns to pink and Brown turns to green, so the combination of colors turned brown. I love that I was able to write a message on top of darker colors! So cool! This is something I have struggled with in various posters I have made in the past. By the way, to come up with this message, I studied five different Mozart operas and thought about what he was trying to convey to us. I think it's very inspirational!
Okay, I guess I've explored the Monteverde Color Changing inks enough for now. I'm sure there are many more discoveries to be made, and that artists far more talented than I will be able to do some remarkable things with these innovative inks. I think it's pretty exciting that Monteverde came up with something so new and creative. No, this set isn't perfect, but it's definitely worth trying if you are the kind of person who likes to be surprised and inspired by something that makes you look at the world a little differently. Have fun!
-Laura P.
I love comments on my blog! Please leave comments if you like the articles, and, if you have any questions about this article, or any of the other blog articles, you can e-mail support @ penboutique.com. Thank you!